Mailchimp
The ReferralHero/Mailchimp integration is very powerful and can work together in a few ways:
Import existing subscribers from Mailchimp to ReferralHero
Use your own Mailchimp signup form to add new subscribers to your Mailchimp contact list and ReferralHero campaign
Sync ReferralHero with Mailchimp
Add ReferralHero subscriber data into your Mailchimp emails using merge tags
How to import subscribers from MailChimp
If you have existing contacts in your Mailchimp account and you want to import/subscribe them all to your ReferralHero campaign, you'll want to follow these instructions:
Go to your campaign dashboard > Subscribers > Import and click on the tab Import from CRM.
If you haven't connected your Mailchimp account yet, please do it now by clicking on the button "Setup Integration".
Choose a MailChimp list from which you want to import subscribers. If you can't see a specific list (for example because you created it recently) click on the link "Update lists".
Specify a URL for the referral link. This is the URL that we will use to generate the referral link for your subscribers. For example, if you use http://mywebsite.com, the referral link will be 'http://mywebsite.com?mwr=123456'
Optional: Choose to "Send Welcome Email" at the time of import. Note, you must activate your Welcome Email in Automations before enabling the "Send Welcome Email".
Click on the button "Import"

We will import your subscribers into your ReferralHero campaign immediately. Depending on how many subscribers you are importing, it might take from a few minutes to several hours. We will send you an email when the import is finished.
How to use a Mailchimp signup form
If you want to use a Mailchimp signup form, instead of the ReferralHero Widget, to add subscribers to your Mailchimp contact list and ReferralHero campaign, you'll want to follow these instructions:
Part I: Creating a Mailchimp Form
Log in to your Mailchimp account
Create a new Signup Form with the following fields:
Email (Required Field)
Subscriber’s email address
Visible
FNAME
Subscriber’s first name
Visible
LNAME
Subscriber’s last name
Visible
*Ex_Field and Ex_Field_2 are commonly used to store additional user data such as address and phone number and in which case, field visibility should be set to ‘Visible’
3. Go to Signup Forms > Embedded Forms to generate HTML code to embed in your site to collect signups
Part II: Adding the ReferralHero Javascript and Mailchimp HTML code to your website
Add the below Javascript function to the end of your Mailchimp HTML code. This function will add the new signup automatically from your Mailchimp form to your ReferralHero campaign.
<script type="text/javascript">// <![CDATA[
var form = document.getElementById('mc-embedded-subscribe-form');
form.addEventListener("submit", function(e){
    var data = {
      email: form.querySelector('#mce-EMAIL').value,
      name: form.querySelector('#mce-FNAME').value + " " + form.querySelector('#mce-LNAME').value
    };
    if (RH) {
      RH.form.submit(data);
    }
})
// ]]></script>2. Paste the Mailchimp and ReferralHero code together into your website where you'd like the form to show. It should look similar to the below:

3. Now when someone signs up through your Mailchimp form, they will be added to your Mailchimp contact list and ReferralHero campaign.
Sync ReferralHero subscribers to Mailchimp
ReferralHero allows you to automatically sync your ReferralHero subscribers with a MailChimp list of your choice.
To connect your MailChimp account, go to your campaign dashboard > Edit Campaign > Integrations > MailChimp
After you connect your account, choose a MailChimp list from the drop-down menu and save the changes. If you create or remove lists in your MailChimp account and need to update the lists on ReferralHero, just click on the "Update lists" link.

The following custom fields will now be automatically created in your Mailchimp list. (Refer to the official MailChimp Merge Tags Documentation for more info).
CUSTOM FIELD
Description
SUB_ID
Subscriber's id
FNAME
Subscriber's first name
LNAME
Subscriber's last name
MWR
Subscriber’s referrer’s referral code
EX_FIELD
Subscriber's extra field value
EX_FIELD_2
Subscriber's second extra field value
CODE
Subscriber's unique referral code
REF_LINK
Subscriber's unique referral link
TOT_REF
Subscriber's total number of referrals
SOURCE
Subscriber's source. If empty value will be "None"
LASTREF
Timestamp of last referral
FB_LINK
Subscriber’s Facebook link
TW_LINK
Subscriber’s Twitter link
EM_LINK
Subscriber’s email link
POSITION
Subscriber’s position
POINTS
Subscriber’s total accumulated points
REFERRER
Subscriber’s referrer’s name
To view the custom fields in your MailChimp list go to Mailchimp.com, then go to Audiences > Settings > List fields and |MERGE| tags.
Your page should look like this:

How to use merge tags in MailChimp
Though a guide on MailChimp merge tags is beyond the scope of this article (and we recommend you to read Mailchimp's official guide), we have created an example of how to use the custom fields ReferralHero sends to your list for your newsletters.
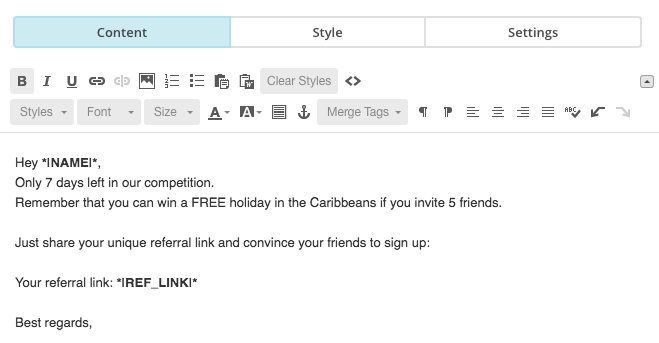
Assuming you are importing all ReferralHero custom fields as described above, let's say you want to send out a newsletter where you remind your subscribers about your referral program and to keep sharing their code.
The body of your email could then look like this:

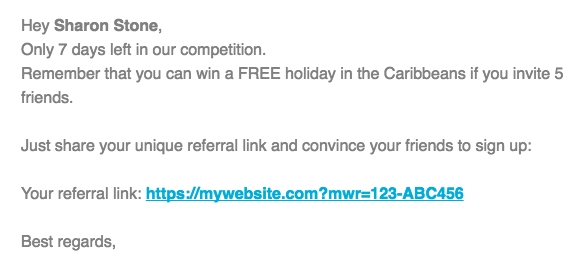
And when you send the email, the custom fields will be replaced with the correct value.

Last updated
Was this helpful?